> ## Documentation Index
> Fetch the complete documentation index at: https://docs.talkifai.dev/llms.txt
> Use this file to discover all available pages before exploring further.
# Telephony
> Connect phone numbers to your agents for inbound and outbound calling.
## Overview
TalkifAI supports full telephony integration — connect a real phone number to your agent and start receiving or making calls immediately.
**Primary carrier support:**
* Twilio (fully tested and documented)
**Other SIP-compatible carriers** (may work with custom configuration):
* Telnyx
* Plivo
* SignalWire
* Bandwidth
* Vonage
***
## Studio Phone Numbers Page
**Navigation:** **Studio → Telephony** (or **Studio → Phone Numbers**)
**URL:** `/telephony`
**Access:** Owners and Admins can manage phone numbers. Members can view and use assigned numbers.
***
### Page Layout
The Phone Numbers page has a **two-column layout**:
#### Left Column: Phone Numbers List (Sidebar)
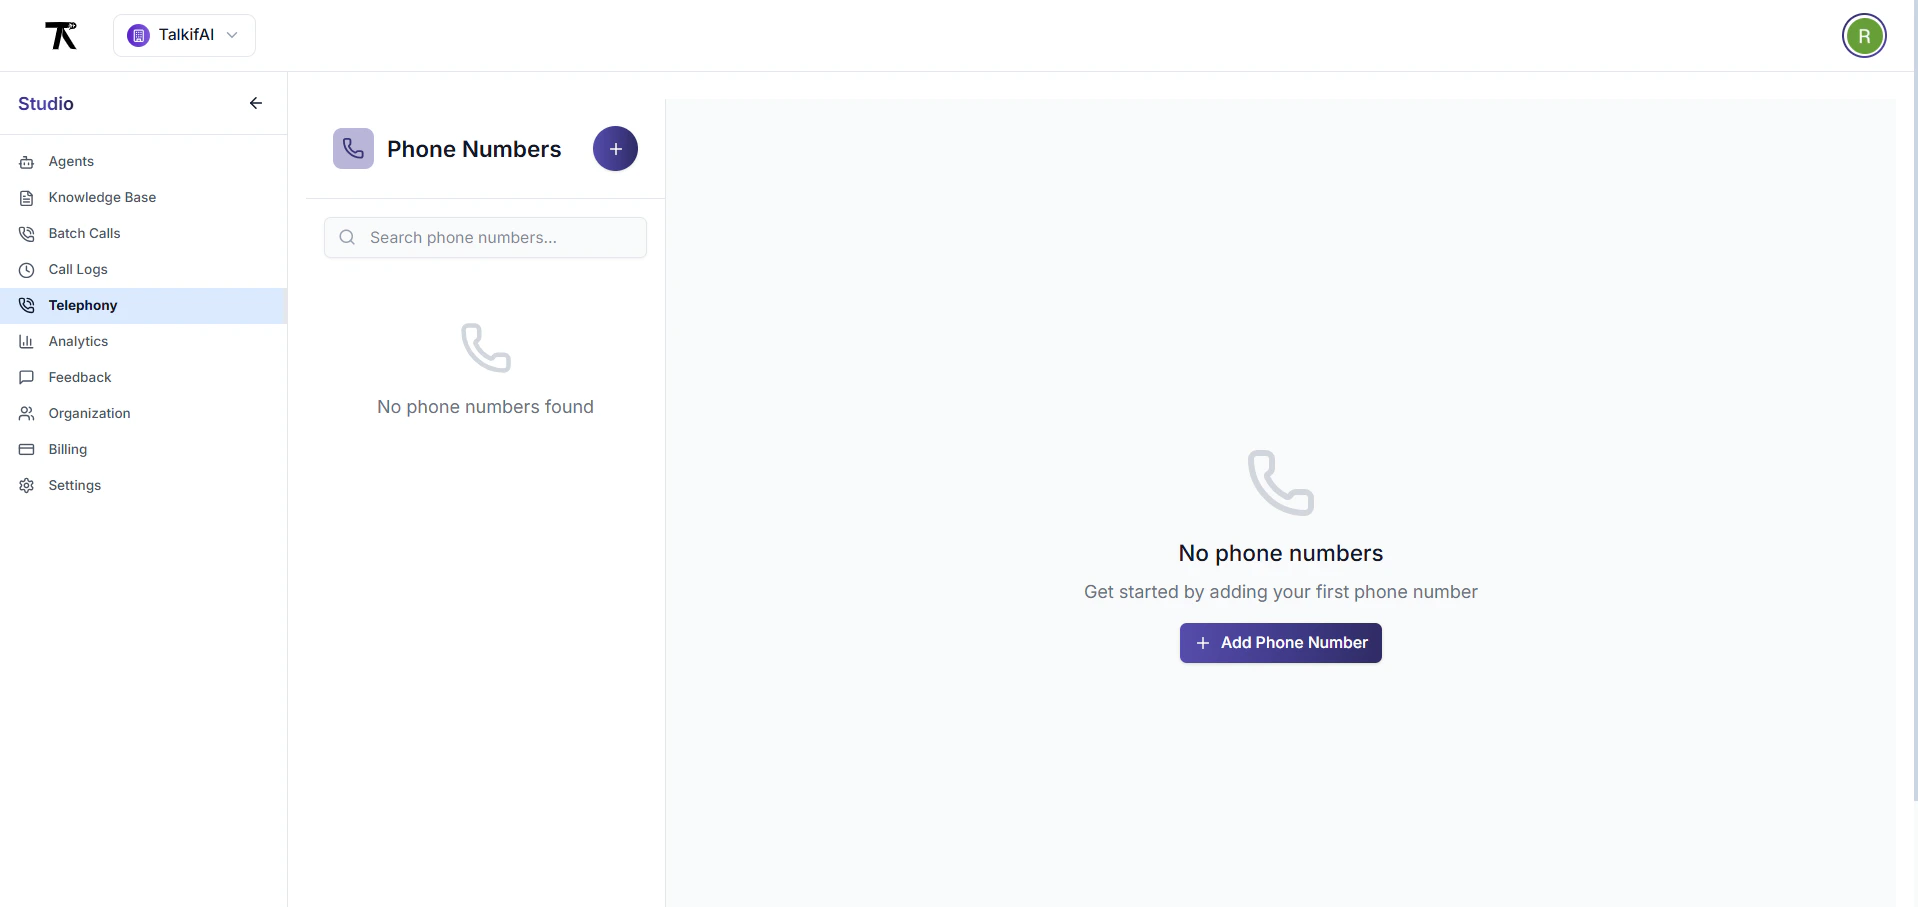 **Width:** 320px (fixed)
**Sections:**
1. **Header**
* **Icon:** Phone icon (purple background)
* **Title:** "Phone Numbers"
* **Add Button:** Plus icon (blue, circular, top-right)
2. **Search Bar**
* **Placeholder:** "Search phone numbers..."
* **Icon:** Search icon (left side)
* **Filters by:**
* Phone number
* Inbound agent name
* Outbound agent name
3. **Phone Numbers List**
* Scrollable list of all phone numbers
* Each number shows:
* **Phone Number** (bold, truncated if long)
* **Status Badge** (green = active, gray = inactive)
* **Inbound Agent** (agent name + mode)
* **Outbound Agent** (agent name + mode)
* **Selected State:** Blue background with blue border
* **Hover State:** Light gray background
4. **Action Buttons (per number)**
* **Edit Button** (pencil icon)
* Opens edit dialog
* Edit number details
* **Delete Button** (trash icon)
* Red on hover
* Requires confirmation
**Empty State:**
* Phone icon (gray, large)
* Text: "No phone numbers found"
* Action: Click "Add Phone Number" button
#### Right Column: Phone Number Details (Main Content)
**When No Number Selected:**
* Phone icon (gray, 64x64)
* Text: "Select a phone number" or "No phone numbers"
* Subtext: Instructions
* **Add Button:** "Add Phone Number" (if no numbers exist)
**When Number Selected:**
**Top Bar:**
* **Phone Number** (large, bold)
* **Status Badge** (green/gray)
* **ID:** Internal phone number ID
* **Test Call Button:** Green "Make Test Call" button
* Links to `/demo-call`
* Opens demo call page
**Configuration Cards:**
**Card 1: Inbound Call Configuration**
* **Title:** "Inbound Call Configuration"
* **Field:** "Inbound Call Agent" dropdown
* Shows all available agents
* Format: "Agent Name (mode)"
* Current selection shown below
* **Save:** Included in main save button
**Card 2: Outbound Call Configuration**
* **Title:** "Outbound Call Configuration"
* **Field:** "Outbound Call Agent" dropdown
* Shows all available agents
* Format: "Agent Name (mode)"
* Current selection shown below
* **Save:** Included in main save button
**Card 3: Call Settings**
* **Title:** "Call Settings"
* **Field 1:** "Webhook URL"
* Input field
* Copy button (clipboard icon)
* Placeholder: "[https://your-webhook-url.com/webhook](https://your-webhook-url.com/webhook)"
* **Field 2:** "Call Recording"
* Dropdown options:
* Disabled
* Record all calls
* Record with consent
**Save Button:**
* **Location:** Below configuration cards
* **Text:** "Save Agent Assignments"
* **Icon:** Save icon
* **Loading State:** Shows spinner, "Saving..."
* **Success:** Toast notification
***
### Add/Edit Phone Number Dialog
**Trigger:** Click "Add Phone Number" (+) button or Edit (pencil) button
**Dialog Title:**
**Width:** 320px (fixed)
**Sections:**
1. **Header**
* **Icon:** Phone icon (purple background)
* **Title:** "Phone Numbers"
* **Add Button:** Plus icon (blue, circular, top-right)
2. **Search Bar**
* **Placeholder:** "Search phone numbers..."
* **Icon:** Search icon (left side)
* **Filters by:**
* Phone number
* Inbound agent name
* Outbound agent name
3. **Phone Numbers List**
* Scrollable list of all phone numbers
* Each number shows:
* **Phone Number** (bold, truncated if long)
* **Status Badge** (green = active, gray = inactive)
* **Inbound Agent** (agent name + mode)
* **Outbound Agent** (agent name + mode)
* **Selected State:** Blue background with blue border
* **Hover State:** Light gray background
4. **Action Buttons (per number)**
* **Edit Button** (pencil icon)
* Opens edit dialog
* Edit number details
* **Delete Button** (trash icon)
* Red on hover
* Requires confirmation
**Empty State:**
* Phone icon (gray, large)
* Text: "No phone numbers found"
* Action: Click "Add Phone Number" button
#### Right Column: Phone Number Details (Main Content)
**When No Number Selected:**
* Phone icon (gray, 64x64)
* Text: "Select a phone number" or "No phone numbers"
* Subtext: Instructions
* **Add Button:** "Add Phone Number" (if no numbers exist)
**When Number Selected:**
**Top Bar:**
* **Phone Number** (large, bold)
* **Status Badge** (green/gray)
* **ID:** Internal phone number ID
* **Test Call Button:** Green "Make Test Call" button
* Links to `/demo-call`
* Opens demo call page
**Configuration Cards:**
**Card 1: Inbound Call Configuration**
* **Title:** "Inbound Call Configuration"
* **Field:** "Inbound Call Agent" dropdown
* Shows all available agents
* Format: "Agent Name (mode)"
* Current selection shown below
* **Save:** Included in main save button
**Card 2: Outbound Call Configuration**
* **Title:** "Outbound Call Configuration"
* **Field:** "Outbound Call Agent" dropdown
* Shows all available agents
* Format: "Agent Name (mode)"
* Current selection shown below
* **Save:** Included in main save button
**Card 3: Call Settings**
* **Title:** "Call Settings"
* **Field 1:** "Webhook URL"
* Input field
* Copy button (clipboard icon)
* Placeholder: "[https://your-webhook-url.com/webhook](https://your-webhook-url.com/webhook)"
* **Field 2:** "Call Recording"
* Dropdown options:
* Disabled
* Record all calls
* Record with consent
**Save Button:**
* **Location:** Below configuration cards
* **Text:** "Save Agent Assignments"
* **Icon:** Save icon
* **Loading State:** Shows spinner, "Saving..."
* **Success:** Toast notification
***
### Add/Edit Phone Number Dialog
**Trigger:** Click "Add Phone Number" (+) button or Edit (pencil) button
**Dialog Title:**
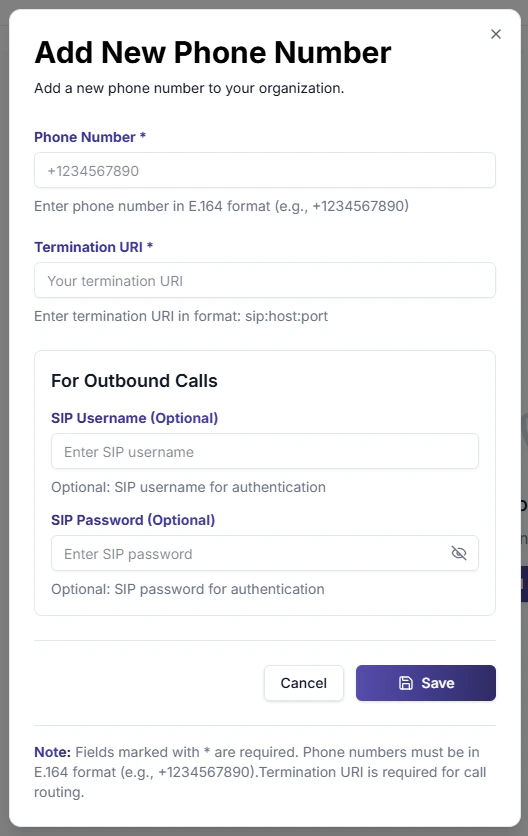 * **Add:** "Add Phone Number"
* **Edit:** "Edit Phone Number"
**Form Fields:**
| Field | Required | Description |
| ------------------- | -------- | --------------------------------------------------------- |
| **Phone Number** | ✅ | E.164 format (+1234567890) |
| **Termination URI** | ✅ | SIP URI for outbound (e.g., `your-trunk.pstn.twilio.com`) |
| **SIP Username** | ❌ | For outbound authentication |
| **SIP Password** | ❌ | For outbound authentication (encrypted) |
**Buttons:**
* **Cancel:** Closes dialog, no changes
* **Save:** Validates and saves number
* Shows loading spinner
* Toast on success/error
* Refreshes list on success
**Validation:**
* Phone number must be in E.164 format
* Must start with `+`
* Minimum 10 digits after `+`
* Termination URI must be valid URL
***
### Delete Phone Number
**Process:**
1. Click trash icon on phone number
2. Confirmation dialog appears:
* "Are you sure you want to delete phone number +1234567890?"
* "This action cannot be undone."
3. Click **Confirm** or **Cancel**
4. If confirmed:
* Calls backend API to delete
* Removes from local state
* Shows success toast
* Selects next number or shows empty state
**What Gets Deleted:**
* Phone number record
* Associated SIP trunks in LiveKit
* Agent assignments
* Call history (preserved in database)
***
### Save Agent Assignments
**Process:**
1. Select inbound agent from dropdown
2. Select outbound agent from dropdown
3. Click "Save Agent Assignments"
4. Sends PUT request to backend:
```json theme={null}
{
"phone_number": "+1234567890",
"inbound_agent_id": "agent_abc123",
"outbound_agent_id": "agent_def456"
}
```
5. Shows loading state
6. Success toast: "Agent assignments saved successfully"
7. Refreshes data
**Validation:**
* At least one agent must be selected
* Agent must be Pipeline or Realtime architecture
* Text agents cannot be assigned
***
### Search & Filter
**Search Functionality:**
* Real-time filtering
* Case-insensitive
* Searches:
* Phone number string
* Inbound agent name
* Outbound agent name
**Example Searches:**
* `+1202` → Finds all numbers starting with +1202
* `Support` → Finds numbers with "Support" agent assigned
* `Sales` → Finds numbers with "Sales" agent assigned
***
### Status Badges
| Status | Color | Meaning |
| ------------ | ----- | ----------------------------------------------- |
| **Active** | Green | Number is configured and can receive/make calls |
| **Inactive** | Gray | Number is not fully configured |
**Active Requirements:**
* ✅ Phone number added
* ✅ Termination URI set
* ✅ At least one agent assigned (inbound or outbound)
* ✅ SIP credentials configured (for outbound)
***
### Keyboard Shortcuts
**Not currently implemented**
**Future:**
* `N` — New phone number
* `Ctrl+F` — Focus search
* `Delete` — Delete selected number
* `Enter` — Save changes
***
### Mobile Responsiveness
**Desktop (≥1024px):**
* Two-column layout (sidebar + main)
* Full configuration cards visible
* All fields accessible
**Tablet (768px - 1023px):**
* Sidebar collapses to icons only
* Main content takes full width
* Cards stack vertically
**Mobile (under 768px):**
* Sidebar becomes drawer (slide-in)
* Hamburger menu to toggle
* Cards full width
* Simplified form fields
***
### Real-Time Updates
**Auto-Refresh:**
* Refreshes when organization changes
* Listens for `agentUpdated` events
* Manual refresh via reload
**Cross-Tab Sync:**
* Uses `CustomEvent` for communication
* Events:
* `phoneNumberAdded`
* `phoneNumberUpdated`
* `phoneNumberDeleted`
***
### Error States
**No Organization Selected:**
* Yellow warning box
* Text: "Please select an organization first"
* Action: Select organization from sidebar
**API Error:**
* Toast notification
* Error message from backend
* Retry option
**Validation Error:**
* Inline error messages
* Red border on invalid fields
* Helper text below field
***
***
## Inbound Calling
Allow customers to call your agent on a real phone number.
### How it works
```
Customer dials phone number
│
▼
Carrier (Twilio/Telnyx/etc.)
│ SIP
▼
LiveKit SIP Server
│
▼
Voice Agent Runtime
│
▼
AI Agent joins the call
```
### Setup with Twilio
* Go to [Twilio Console](https://console.twilio.com/) → **Elastic SIP Trunking** → **Trunks** → **Create Trunk**
* Set **Friendly Name**: e.g., `TalkifAI`
* Note the **Termination SIP URI** (e.g., `your-trunk.pstn.twilio.com`)
In your trunk → **Origination** section, add:
```
sip:livekit.talkifai.dev:5061;transport=tls
```
The `;transport=tls` suffix enables Secure SIP (TLS). Required for production deployments.
* Go to **Studio** → **Phone Numbers** → **Add Number**
* Enter your Twilio phone number in E.164 format (e.g., `+1234567890`)
* Enter the **Termination URI** from your Twilio trunk
* Optionally enter SIP username and password (for outbound authentication)
* Click **Save**
* In the Phone Numbers list, select your phone number
* Under **Inbound Agent**, select the agent that should answer incoming calls
* Click **Save**
* Go to [Twilio Console](https://console.twilio.com/) → **Phone Numbers** → **Manage** → **Active Numbers**
* Select your Twilio phone number
* Under **Voice Configuration**:
* **Configure with**: SIP Trunk
* **SIP Trunk**: Select your trunk (e.g., "TalkifAI")
* Click **Save**
Call your phone number. The agent should answer within 2-3 seconds.
***
## Outbound Calling
Programmatically call any phone number from your agent.
### Prerequisites
1. **Outbound Trunk**: Configure an outbound SIP trunk in your carrier console
2. **SIP Credentials**: Create SIP username/password for authentication
3. **IP ACL**: Add your VM's public IP address to the carrier's allowed list
4. **Phone Number**: Add the phone number in TalkifAI Studio with SIP credentials
### Configure Outbound Calling
**For Twilio:**
* Go to **Elastic SIP Trunking** → **Manage** → **Credential Lists**
* Create a credential list with username/password
* Go to **IP ACL** and add your VM's public IP address
* In Studio → **Phone Numbers** → **Add Number**
* Enter phone number in E.164 format
* Enter **Termination URI** (your Twilio trunk URI)
* Enter **SIP Username** and **SIP Password** (from your credential list)
* Click **Save**
* Select the phone number in the list
* Under **Outbound Agent**, select the agent to use for outgoing calls
* Click **Save**
Text-only agents cannot make voice calls. Only Pipeline or Realtime architecture agents can be used for outbound calling.
* In your Twilio trunk → **Termination** section:
* Set **Termination SIP URI**: `livekit.talkifai.dev:5061` (or your LiveKit SIP server)
* Assign your credential list and IP ACL
### Via Dashboard
1. Go to **Studio** → **Phone Numbers**
2. Select a number with an outbound agent configured
3. Click **Make Call**
4. Enter the destination number in E.164 format (e.g., `+12025550123`)
### Via API
The telephony API is exposed via the backend service, not the Studio API. You'll need to call the backend directly.
```bash theme={null}
POST /telephony/outbound-call
Content-Type: application/json
{
"to_number": "+12025550123",
"from_number": "+1234567890"
}
```
**Parameters:**
| Field | Type | Required | Description |
| ------------- | ------ | -------- | --------------------------------------------------------------------------- |
| `to_number` | string | ✅ | Destination phone number in E.164 format |
| `from_number` | string | ✅ | Source phone number (must be registered in TalkifAI with an outbound agent) |
**Response:**
```json theme={null}
{
"success": true,
"message": "Call initiated successfully",
"room_name": "outbound_agent_abc123_12025550123_1234567890",
"agent": {
"id": "agent_abc123",
"name": "Sales Agent"
},
"from_number": "+1234567890",
"to_number": "+12025550123"
}
```
**Error Responses:**
| Status Code | Error | Description |
| ----------- | ---------------------- | ----------------------------------------------- |
| `400` | Invalid number | Phone number format is invalid |
| `402` | Insufficient balance | Carrier account has insufficient funds |
| `404` | Phone number not found | The `from_number` is not registered in TalkifAI |
| `408` | Timeout / No answer | Call was not answered |
| `500` | Server error | Internal error initiating the call |
***
## Managing Phone Numbers
### Phone Number Fields
| Field | Required | Description |
| ------------------- | -------- | ----------------------------------------------------- |
| **Number** | ✅ | Phone number in E.164 format (e.g., `+1234567890`) |
| **Termination URI** | ✅ | SIP URI for outbound calls (from your carrier) |
| **SIP Username** | ❌ | Username for SIP authentication (outbound) |
| **SIP Password** | ❌ | Password for SIP authentication (outbound, encrypted) |
| **Inbound Agent** | ❌ | Agent to answer incoming calls |
| **Outbound Agent** | ❌ | Agent to use for outgoing calls |
### Assigning Agents
Each phone number can have:
* **Inbound Agent** — Handles incoming calls (answered when someone calls this number)
* **Outbound Agent** — Used for outgoing calls (when calling from this number)
You can assign different agents to the same number for inbound/outbound, or leave one unassigned.
**Text-only agents cannot make or receive voice calls.** Only assign Pipeline or Realtime architecture agents to phone numbers.
### Deleting a Phone Number
Deleting a phone number will also delete associated SIP trunks and dispatch rules in LiveKit. This action cannot be undone.
1. Go to **Studio** → **Phone Numbers**
2. Select the phone number
3. Click the **Delete** button
4. Confirm deletion
***
## BYOC (Bring Your Own Carrier)
If you have an existing SIP infrastructure, use BYOC to connect it to TalkifAI without porting numbers.
**What BYOC gives you:**
* Connect your existing Twilio/Telnyx/Plivo accounts
* Use your own SIP trunks and phone numbers
* Pay carriers directly (no markup from TalkifAI)
* Full control over SIP configuration
**Requirements:**
* SIP trunk from your carrier
* SIP credentials (username/password)
* LiveKit SIP server configured (self-hosted or cloud)
See the full guide: [BYOC Setup](/guides/byoc)
***
## Credential Security
All SIP credentials (passwords, auth tokens) are encrypted using **Fernet encryption** before storage in the database. Never share your raw credentials in logs, chat, or support tickets.
**How it works:**
* Credentials are encrypted with a `FERNET_KEY` environment variable
* Encrypted data is stored in the `PhoneNumber` table (`sipPassword` field)
* The encryption key is set once during deployment and should **never be changed** after credentials are saved
* If you lose the `FERNET_KEY`, all stored credentials will be unrecoverable
**Best practices:**
* Store your `FERNET_KEY` in a secure secrets manager
* Never commit the key to version control
* Rotate credentials periodically (not the encryption key)
* Use different credentials for production and development
***
## Carrier-Specific Configuration
### Twilio
**Console Links:**
* [Elastic SIP Trunking](https://console.twilio.com/us1/develop/sip-trunking/manage/trunks)
* [Phone Numbers](https://console.twilio.com/us1/develop/phone-numbers/manage/incoming)
* [Credential Lists](https://console.twilio.com/us1/develop/sip-trunking/manage/credential-lists)
* [IP ACL](https://console.twilio.com/us1/develop/sip-trunking/manage/ip-access-control-lists)
* [Geo Permissions](https://console.twilio.com/us1/develop/voice/settings/geo-permissions)
**Secure Trunking (TLS):**
1. Enable **Secure Trunking** in your trunk's General Settings
2. Add `;transport=tls` to your Origination URI:
```
sip:livekit.talkifai.dev:5061;transport=tls
```
3. For outbound trunks, set:
```json theme={null}
"transport": "SIP_TRANSPORT_TLS",
"media_encryption": "SIP_MEDIA_ENCRYPT_REQUIRE"
```
**International Calling:**
* Go to **Voice** → **Settings** → **Geo Permissions**
* Enable the countries you want to call
### Telnyx
Telnyx configuration is similar to Twilio. Use the Telnyx Mission Control Portal to configure SIP trunks and phone numbers.
**Key differences:**
* Telnyx uses "Outbound Profiles" instead of credential lists
* IP ACL is configured per outbound profile
* Authentication can be IP-based or credential-based
### SignalWire
SignalWire is compatible with Twilio's API in many cases. You may be able to use Twilio's configuration as a reference.
***
## Troubleshooting
**Check:**
1. SIP trunk origination URI is correct (`sip:livekit.talkifai.dev:5061;transport=tls`)
2. Phone number is assigned to an inbound agent
3. Twilio number is configured to use your SIP trunk
4. LiveKit SIP server is running and accessible
**Cause:** The `from_number` is not registered in TalkifAI or has no outbound agent assigned.
**Fix:**
1. Go to Studio → Phone Numbers
2. Add the phone number if it doesn't exist
3. Assign an outbound agent
4. Ensure SIP credentials are configured
**Cause:** Insufficient balance in your carrier account.
**Fix:** Add funds to your Twilio/Telnyx account and retry.
**Check:**
1. SIP username/password are correct
2. Credential list is assigned to the trunk
3. IP ACL includes your VM's public IP address
4. Credentials are properly encrypted (check `FERNET_KEY` is set correctly)
**Error:** "Agent is a text-only agent and cannot make voice calls"
**Fix:** Assign a Pipeline or Realtime architecture agent instead. Text agents only support chat, not voice calls.
***
## API Reference
For programmatic access, see:
* [Phone Numbers API](/api-reference/phone-numbers)
* [Telephony API](/api-reference/telephony)
***
## Related Guides
* [BYOC Setup](/guides/byoc) — Connect your own SIP carrier
* [Agent Architecture](/platform/agent-architecture) — Understand Pipeline vs Realtime vs Text
* [LiveKit SIP](https://docs.livekit.io/agents/sip/) — LiveKit SIP documentation
* **Add:** "Add Phone Number"
* **Edit:** "Edit Phone Number"
**Form Fields:**
| Field | Required | Description |
| ------------------- | -------- | --------------------------------------------------------- |
| **Phone Number** | ✅ | E.164 format (+1234567890) |
| **Termination URI** | ✅ | SIP URI for outbound (e.g., `your-trunk.pstn.twilio.com`) |
| **SIP Username** | ❌ | For outbound authentication |
| **SIP Password** | ❌ | For outbound authentication (encrypted) |
**Buttons:**
* **Cancel:** Closes dialog, no changes
* **Save:** Validates and saves number
* Shows loading spinner
* Toast on success/error
* Refreshes list on success
**Validation:**
* Phone number must be in E.164 format
* Must start with `+`
* Minimum 10 digits after `+`
* Termination URI must be valid URL
***
### Delete Phone Number
**Process:**
1. Click trash icon on phone number
2. Confirmation dialog appears:
* "Are you sure you want to delete phone number +1234567890?"
* "This action cannot be undone."
3. Click **Confirm** or **Cancel**
4. If confirmed:
* Calls backend API to delete
* Removes from local state
* Shows success toast
* Selects next number or shows empty state
**What Gets Deleted:**
* Phone number record
* Associated SIP trunks in LiveKit
* Agent assignments
* Call history (preserved in database)
***
### Save Agent Assignments
**Process:**
1. Select inbound agent from dropdown
2. Select outbound agent from dropdown
3. Click "Save Agent Assignments"
4. Sends PUT request to backend:
```json theme={null}
{
"phone_number": "+1234567890",
"inbound_agent_id": "agent_abc123",
"outbound_agent_id": "agent_def456"
}
```
5. Shows loading state
6. Success toast: "Agent assignments saved successfully"
7. Refreshes data
**Validation:**
* At least one agent must be selected
* Agent must be Pipeline or Realtime architecture
* Text agents cannot be assigned
***
### Search & Filter
**Search Functionality:**
* Real-time filtering
* Case-insensitive
* Searches:
* Phone number string
* Inbound agent name
* Outbound agent name
**Example Searches:**
* `+1202` → Finds all numbers starting with +1202
* `Support` → Finds numbers with "Support" agent assigned
* `Sales` → Finds numbers with "Sales" agent assigned
***
### Status Badges
| Status | Color | Meaning |
| ------------ | ----- | ----------------------------------------------- |
| **Active** | Green | Number is configured and can receive/make calls |
| **Inactive** | Gray | Number is not fully configured |
**Active Requirements:**
* ✅ Phone number added
* ✅ Termination URI set
* ✅ At least one agent assigned (inbound or outbound)
* ✅ SIP credentials configured (for outbound)
***
### Keyboard Shortcuts
**Not currently implemented**
**Future:**
* `N` — New phone number
* `Ctrl+F` — Focus search
* `Delete` — Delete selected number
* `Enter` — Save changes
***
### Mobile Responsiveness
**Desktop (≥1024px):**
* Two-column layout (sidebar + main)
* Full configuration cards visible
* All fields accessible
**Tablet (768px - 1023px):**
* Sidebar collapses to icons only
* Main content takes full width
* Cards stack vertically
**Mobile (under 768px):**
* Sidebar becomes drawer (slide-in)
* Hamburger menu to toggle
* Cards full width
* Simplified form fields
***
### Real-Time Updates
**Auto-Refresh:**
* Refreshes when organization changes
* Listens for `agentUpdated` events
* Manual refresh via reload
**Cross-Tab Sync:**
* Uses `CustomEvent` for communication
* Events:
* `phoneNumberAdded`
* `phoneNumberUpdated`
* `phoneNumberDeleted`
***
### Error States
**No Organization Selected:**
* Yellow warning box
* Text: "Please select an organization first"
* Action: Select organization from sidebar
**API Error:**
* Toast notification
* Error message from backend
* Retry option
**Validation Error:**
* Inline error messages
* Red border on invalid fields
* Helper text below field
***
***
## Inbound Calling
Allow customers to call your agent on a real phone number.
### How it works
```
Customer dials phone number
│
▼
Carrier (Twilio/Telnyx/etc.)
│ SIP
▼
LiveKit SIP Server
│
▼
Voice Agent Runtime
│
▼
AI Agent joins the call
```
### Setup with Twilio
* Go to [Twilio Console](https://console.twilio.com/) → **Elastic SIP Trunking** → **Trunks** → **Create Trunk**
* Set **Friendly Name**: e.g., `TalkifAI`
* Note the **Termination SIP URI** (e.g., `your-trunk.pstn.twilio.com`)
In your trunk → **Origination** section, add:
```
sip:livekit.talkifai.dev:5061;transport=tls
```
The `;transport=tls` suffix enables Secure SIP (TLS). Required for production deployments.
* Go to **Studio** → **Phone Numbers** → **Add Number**
* Enter your Twilio phone number in E.164 format (e.g., `+1234567890`)
* Enter the **Termination URI** from your Twilio trunk
* Optionally enter SIP username and password (for outbound authentication)
* Click **Save**
* In the Phone Numbers list, select your phone number
* Under **Inbound Agent**, select the agent that should answer incoming calls
* Click **Save**
* Go to [Twilio Console](https://console.twilio.com/) → **Phone Numbers** → **Manage** → **Active Numbers**
* Select your Twilio phone number
* Under **Voice Configuration**:
* **Configure with**: SIP Trunk
* **SIP Trunk**: Select your trunk (e.g., "TalkifAI")
* Click **Save**
Call your phone number. The agent should answer within 2-3 seconds.
***
## Outbound Calling
Programmatically call any phone number from your agent.
### Prerequisites
1. **Outbound Trunk**: Configure an outbound SIP trunk in your carrier console
2. **SIP Credentials**: Create SIP username/password for authentication
3. **IP ACL**: Add your VM's public IP address to the carrier's allowed list
4. **Phone Number**: Add the phone number in TalkifAI Studio with SIP credentials
### Configure Outbound Calling
**For Twilio:**
* Go to **Elastic SIP Trunking** → **Manage** → **Credential Lists**
* Create a credential list with username/password
* Go to **IP ACL** and add your VM's public IP address
* In Studio → **Phone Numbers** → **Add Number**
* Enter phone number in E.164 format
* Enter **Termination URI** (your Twilio trunk URI)
* Enter **SIP Username** and **SIP Password** (from your credential list)
* Click **Save**
* Select the phone number in the list
* Under **Outbound Agent**, select the agent to use for outgoing calls
* Click **Save**
Text-only agents cannot make voice calls. Only Pipeline or Realtime architecture agents can be used for outbound calling.
* In your Twilio trunk → **Termination** section:
* Set **Termination SIP URI**: `livekit.talkifai.dev:5061` (or your LiveKit SIP server)
* Assign your credential list and IP ACL
### Via Dashboard
1. Go to **Studio** → **Phone Numbers**
2. Select a number with an outbound agent configured
3. Click **Make Call**
4. Enter the destination number in E.164 format (e.g., `+12025550123`)
### Via API
The telephony API is exposed via the backend service, not the Studio API. You'll need to call the backend directly.
```bash theme={null}
POST /telephony/outbound-call
Content-Type: application/json
{
"to_number": "+12025550123",
"from_number": "+1234567890"
}
```
**Parameters:**
| Field | Type | Required | Description |
| ------------- | ------ | -------- | --------------------------------------------------------------------------- |
| `to_number` | string | ✅ | Destination phone number in E.164 format |
| `from_number` | string | ✅ | Source phone number (must be registered in TalkifAI with an outbound agent) |
**Response:**
```json theme={null}
{
"success": true,
"message": "Call initiated successfully",
"room_name": "outbound_agent_abc123_12025550123_1234567890",
"agent": {
"id": "agent_abc123",
"name": "Sales Agent"
},
"from_number": "+1234567890",
"to_number": "+12025550123"
}
```
**Error Responses:**
| Status Code | Error | Description |
| ----------- | ---------------------- | ----------------------------------------------- |
| `400` | Invalid number | Phone number format is invalid |
| `402` | Insufficient balance | Carrier account has insufficient funds |
| `404` | Phone number not found | The `from_number` is not registered in TalkifAI |
| `408` | Timeout / No answer | Call was not answered |
| `500` | Server error | Internal error initiating the call |
***
## Managing Phone Numbers
### Phone Number Fields
| Field | Required | Description |
| ------------------- | -------- | ----------------------------------------------------- |
| **Number** | ✅ | Phone number in E.164 format (e.g., `+1234567890`) |
| **Termination URI** | ✅ | SIP URI for outbound calls (from your carrier) |
| **SIP Username** | ❌ | Username for SIP authentication (outbound) |
| **SIP Password** | ❌ | Password for SIP authentication (outbound, encrypted) |
| **Inbound Agent** | ❌ | Agent to answer incoming calls |
| **Outbound Agent** | ❌ | Agent to use for outgoing calls |
### Assigning Agents
Each phone number can have:
* **Inbound Agent** — Handles incoming calls (answered when someone calls this number)
* **Outbound Agent** — Used for outgoing calls (when calling from this number)
You can assign different agents to the same number for inbound/outbound, or leave one unassigned.
**Text-only agents cannot make or receive voice calls.** Only assign Pipeline or Realtime architecture agents to phone numbers.
### Deleting a Phone Number
Deleting a phone number will also delete associated SIP trunks and dispatch rules in LiveKit. This action cannot be undone.
1. Go to **Studio** → **Phone Numbers**
2. Select the phone number
3. Click the **Delete** button
4. Confirm deletion
***
## BYOC (Bring Your Own Carrier)
If you have an existing SIP infrastructure, use BYOC to connect it to TalkifAI without porting numbers.
**What BYOC gives you:**
* Connect your existing Twilio/Telnyx/Plivo accounts
* Use your own SIP trunks and phone numbers
* Pay carriers directly (no markup from TalkifAI)
* Full control over SIP configuration
**Requirements:**
* SIP trunk from your carrier
* SIP credentials (username/password)
* LiveKit SIP server configured (self-hosted or cloud)
See the full guide: [BYOC Setup](/guides/byoc)
***
## Credential Security
All SIP credentials (passwords, auth tokens) are encrypted using **Fernet encryption** before storage in the database. Never share your raw credentials in logs, chat, or support tickets.
**How it works:**
* Credentials are encrypted with a `FERNET_KEY` environment variable
* Encrypted data is stored in the `PhoneNumber` table (`sipPassword` field)
* The encryption key is set once during deployment and should **never be changed** after credentials are saved
* If you lose the `FERNET_KEY`, all stored credentials will be unrecoverable
**Best practices:**
* Store your `FERNET_KEY` in a secure secrets manager
* Never commit the key to version control
* Rotate credentials periodically (not the encryption key)
* Use different credentials for production and development
***
## Carrier-Specific Configuration
### Twilio
**Console Links:**
* [Elastic SIP Trunking](https://console.twilio.com/us1/develop/sip-trunking/manage/trunks)
* [Phone Numbers](https://console.twilio.com/us1/develop/phone-numbers/manage/incoming)
* [Credential Lists](https://console.twilio.com/us1/develop/sip-trunking/manage/credential-lists)
* [IP ACL](https://console.twilio.com/us1/develop/sip-trunking/manage/ip-access-control-lists)
* [Geo Permissions](https://console.twilio.com/us1/develop/voice/settings/geo-permissions)
**Secure Trunking (TLS):**
1. Enable **Secure Trunking** in your trunk's General Settings
2. Add `;transport=tls` to your Origination URI:
```
sip:livekit.talkifai.dev:5061;transport=tls
```
3. For outbound trunks, set:
```json theme={null}
"transport": "SIP_TRANSPORT_TLS",
"media_encryption": "SIP_MEDIA_ENCRYPT_REQUIRE"
```
**International Calling:**
* Go to **Voice** → **Settings** → **Geo Permissions**
* Enable the countries you want to call
### Telnyx
Telnyx configuration is similar to Twilio. Use the Telnyx Mission Control Portal to configure SIP trunks and phone numbers.
**Key differences:**
* Telnyx uses "Outbound Profiles" instead of credential lists
* IP ACL is configured per outbound profile
* Authentication can be IP-based or credential-based
### SignalWire
SignalWire is compatible with Twilio's API in many cases. You may be able to use Twilio's configuration as a reference.
***
## Troubleshooting
**Check:**
1. SIP trunk origination URI is correct (`sip:livekit.talkifai.dev:5061;transport=tls`)
2. Phone number is assigned to an inbound agent
3. Twilio number is configured to use your SIP trunk
4. LiveKit SIP server is running and accessible
**Cause:** The `from_number` is not registered in TalkifAI or has no outbound agent assigned.
**Fix:**
1. Go to Studio → Phone Numbers
2. Add the phone number if it doesn't exist
3. Assign an outbound agent
4. Ensure SIP credentials are configured
**Cause:** Insufficient balance in your carrier account.
**Fix:** Add funds to your Twilio/Telnyx account and retry.
**Check:**
1. SIP username/password are correct
2. Credential list is assigned to the trunk
3. IP ACL includes your VM's public IP address
4. Credentials are properly encrypted (check `FERNET_KEY` is set correctly)
**Error:** "Agent is a text-only agent and cannot make voice calls"
**Fix:** Assign a Pipeline or Realtime architecture agent instead. Text agents only support chat, not voice calls.
***
## API Reference
For programmatic access, see:
* [Phone Numbers API](/api-reference/phone-numbers)
* [Telephony API](/api-reference/telephony)
***
## Related Guides
* [BYOC Setup](/guides/byoc) — Connect your own SIP carrier
* [Agent Architecture](/platform/agent-architecture) — Understand Pipeline vs Realtime vs Text
* [LiveKit SIP](https://docs.livekit.io/agents/sip/) — LiveKit SIP documentation